Photography Notes
Miscellaneous Points
You need not be an expert photographer, nor do you need expensive equipment to create a good-looking web page. The cameras you already own will do for most of your web needs. For example, most of the images on this web page were made with an inexpensive Vivitar auto-focus 35mm camera and cheap, generic 100 or 200ASA color print film. The captured video images were taken with a JVC super VHS-C camcorder. I used an AI "Gotcha" module connected to my printer port to grab single video frames. The JVC does an excellent job of capturing sparks even in very low light. I turned off every light in my garage except for one 60W tungsten bulb in the far corner, which provided just enough light for the auto focus feature to work. The resulting video looks great. The audio is good too. The captured video still frames don't do it justice. The little VHS-C tapes look ten times better on TV. I eventually retired the "Gotcha" video capture device in favor of an ATI "All-In-Wonder-128" video graphics adapter with video capture capability. The animated GIF on my homepage is one example of the work I've done with it. I've also used it to create full motion video clips of operating coils. My latest acquisition is a Kodak DX3900 digital camera. The little digicam has proven itself capable of handling both spark photography and general photography chores.
Sparks on Film
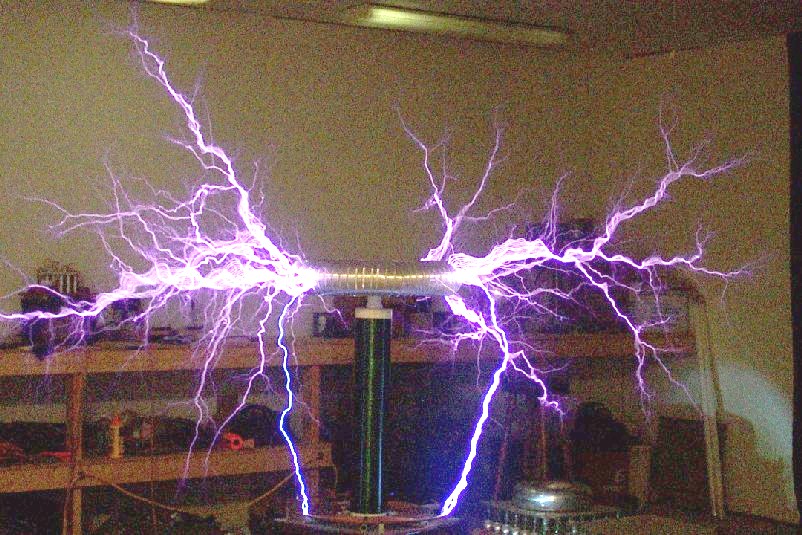
Spark photography is an area of special interest to many coil hobbyists. Conventional snapshots of operating coils usually turn out pretty disappointing. Opinions about how to capture sparks on film vary tremendously depending on whom you ask. I'm no photography expert, but I can tell you what worked for me. For my earliest attempt at spark photography I used an ancient Yashica "Electro 35" 35mm rangefinder type camera. I also used a tripod and a shutter cable to eliminate camera wiggle. I used cheap, generic 200ASA color print film. I set up the camera & tripod a safe distance from the coil and focused on the toroid. I selected an f-stop of 5.6, and set the shutter control on "B" (bulb). I turned off all the lights so the garage was completely dark except for spark light from the Tesla coil, and manually opened the shutter for anything from 1 second to as much as 6 seconds until I'd used all 24 frames. I hoped this shotgun approach to exposure time would net me two or three usable photos. I used conventional, drug store film processing with no special instructions.
To my amazement, all 24 prints turned out great. The mass of streamers from the long exposures looks fantastic. Of course I realize that a time exposure doesn't give a realistic picture of what the coil output looks like "in person", but I don't care! Besides, the longish exposures can reveal other discharge phenomena, such as "banjo strings", clustering effects, and so on. For a second round of photographs with the New & Improved Junk Box Coil I took a slightly different approach. The camera and setup was the same except that I used a medium aperture of f4 and hand exposed each shot for about 1 second. These came out even better than the first batch. More recently I have experimented with a Pentax "ME Super" 35mm SLR I picked up at a thrift store for forty bucks. I haven't done much work with this camera, but I did shoot some spark images of my 6" coil. I assumed the more sophisticated SLR would produce images superior to the old Yashica rangefinder, but this has not been the case. The Pentax images are just as good as the Electro-35 images, but not any better. Oh well, live & learn. Many photographers advocate opening the aperture as wide as possible to capture more light and allow for shorter exposure times. Be careful though or you may not have adequate depth of focus. Even my little 4" coil can produce streamers up to 60" long. Taking the 20" diameter toroid into account, I can end up with a streamer field up to 12 feet deep. Close the aperture enough to get adequate depth of field or the ends of the streamers will be out of focus.
Going Digital
Recently I've begun experimenting with digital spark photography using the Kodak DX3900 mentioned earlier. If you want to capture streamers with a digicam, be sure to select a model that offers manual control of the shutter and aperture. Full auto mode on a digicam is just not going to do a very good job capturing sparks. For my own digital spark photos, I selected ISO 400 with a 2-second shutter, and turned off the flash. I mounted the camera on a tripod to eliminate wiggle. I also put the camera as far away from the operating coil as possible and used the optical zoom to bring the coil closer. I felt it important to put lots of distance between that snarling coil and the sensitive electronics of my digicam. I shot a number of images of the new & improved junk box coil powered by my "tamed" MOT power supply. I captured some sparks, and I learned a few things.
For one thing, the digicam is not nearly as "forgiving" as the 35mm film camera. Illumination seems especially critical with the digicam, whereas a wide range of lighting conditions and exposure times gave good results with film. For example, if I used only ambient spark light with the digicam, the images all came out too dark. I tried using only one 60W tungsten bulb in the rearmost corner of the garage, and the images were all washed out. A flashlight shining on the operating coil also resulted in washed out images. I got best results by shining the beam of a 5 cell MagLight straight up on the white ceiling. This scattered just enough diffused light on the coil for a good image without washing out the streamers. The sensitivity of the digicam is offset by the fact that unlimited experimentation is free, since there is no film or processing involved. Likewise, the LCD preview screen on the digicam provides instant feedback as to the quality of the image, allowing immediate adjustment in lighting conditions and camera settings until the images come out right.
I hope all this stuff helps somebody!