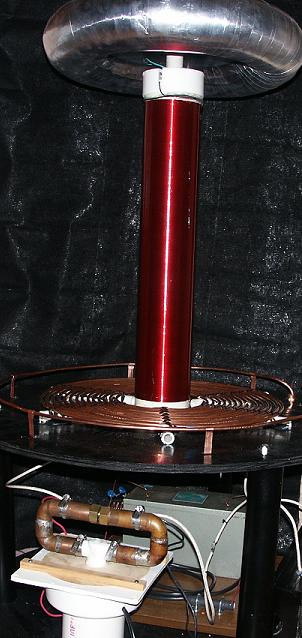
Table Design
The table was quite easy to build. The materials used were:
1 sheet 5/8 inch plywood
4 feet 1.5 inch PVC
2 3/8 inch all thread 3 feet long
9 nylon lock nuts and washers
Black spray paint
3 casters and whatever mounting hardware is required
Using a homemade beam compass, I drew 2 circles, 32 inches in diameter on the plywood.
It's important to mark the center because you'll need it later. After cutting out the circles, I
marked a starting point on the edge of one of them. This will be the one for the top. From the
starting point, I measured 33.5 inches around the edge and place a mark there. From this mark,
I repeated the process. Using a straight edge, from each mark, I was able to draw a triangle on
the top of the board. Using the straight edge again, aligning it with one of the tips of the triangle and
the center mark, I drew a line completely across the circle. I did the same with the remaining 2
points of the triangle. We now know where to place our 6 PVC insulators for the primary coil.
Straight lines were then marked between 2 lines at the edge of the circle. This is done in three
locations, evenly placed around the board. Measure and mark the center of these. It should
look something like this.
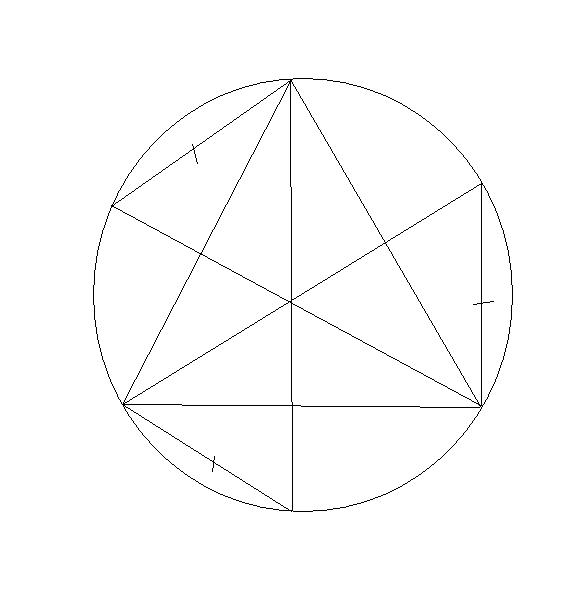
Use the straight edge, aligned with each center mark and the center of the circle, and place another
mark 3 inches from the edge. Stack the two circles on top of each other and clamp them together.
Draw a mark along the edge of the two boards, anywhere, so you'll know how to line them up later.
Drill 11/32 inch holes at each of the 3 marks that are placed 3 inches from the edge through both
boards.
Cut the 1.5 inch PVC into 3 16 inch lengths. Cut 3 lengths of the 3/8 inch all thread into 18 inch
sections. Put lock nuts on each rod a few inches down. Place a washer on each of these and
put them in the holes of the top circle. Put another washer on the all thread and top it off with
another nylon lock nut. Tighten the nuts until the all thread is flush with the top of the nut. Tighten
the nuts on the underside. Place the PVC over the all thread, attach the bottom circle, aligning your
edge marks and put on the washers and lock nuts. Try to center each PVC leg as you tighten the
bottom in place.
Place tape over the 6 lines that mark the primary coil insulator positions. Paint your table, add the
casters and that's it.