|
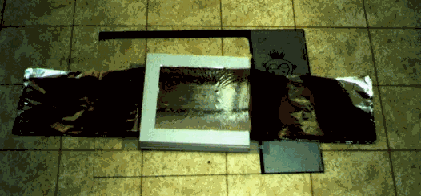
My homebrew caps during construcion. |
|
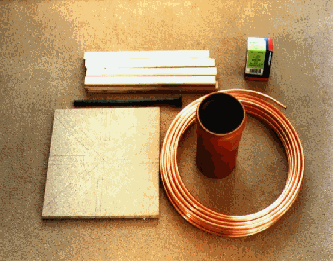
The cap was made with simple to find materials. First of all I started out with some large sheets of white styrene plastic 1 mm thick. Each plastic plate was cut into 9x9" squares. The tinfoil was cut a little smaller 7x30". The actual length of the foil was the length of the foil on the roll. This allows a 1" "gap" all around the tinfoil. I used the extra strong foil and the thin stuff is harder to work with when cutting. |
|
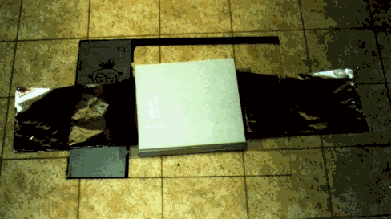
Here was the next step from the above picture. I simply placed a blank plate ontop. The next step was the same as the previous picture appart from the foil was layed to the left ( and to to the right in the previous picture ) . This was done alternatly for about 30 sheets of plastic. |
|
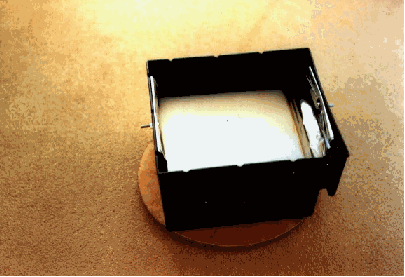
The finished cap in a nice black box. The cap was filled with Transformer oil and left overnight. The next day 2 bricks were placed ontop to help hold the thing together and push more air out between the plates. The ends of the foil were all folded up and bolted to the sides of the tub using big washers. I rated the capacitor at 8Kv , 6nf. .To which I made 4 of. |
|
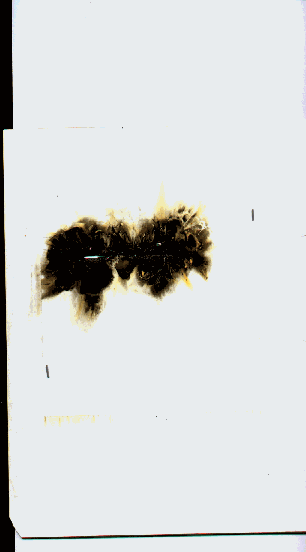
A while latter I got another NST rated at 10Kv. The cap failed very badly when the coil was mistuned. Unfortunately it took all 4 caps with it and this is the pic of the only plate I could actually separate. You can just make out the white hole in the nice burnt mess :) I latter rebuilt all 4 caps. I spaced out the "end to end" tin foil plates to give 2" from one side to the other. The outside cap was still 1". It was found that the voltage was tracking slightly from one contact to the other. I also doubled up on the plastic also using 2 mm per player. The caps were then sunk back into the tubs under oil. Caps were rated at 18Kv ( couldn't get any higher than that to test ) , at 3nf. I have 4 of these again and they have kept life for almost 3 years. I found the transformer oil was starting to make the plastic go soft and brittle though the caps still run fine. The oil eventually found its way up the tinfoil and started to leek around the bolts on each side. So it would be a good idea to seal them with glue. |
|
Primary construction... |
|
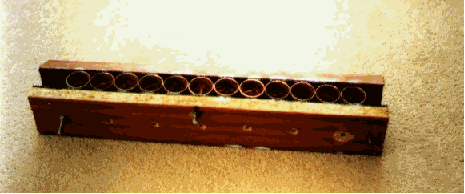
Here we have a list of bits.. 1x 12x12x0.5" base board. 8x 12x1x0.5" Primary supports. 1x box of 8mm cable clips. 1x 8mm pipe spring bender. 1x 30 meters of 8mm copper pipe. 1x 6.3" pipe ( small secondary form off cut) The wood was marked out to where the supports would go. Its faint but you can just make it out. |


|
Here the primary supports were possisioned. The 6.3" tube was there to give a good fit around the secondary form when in place. The 8 supports were glued and left to dry for 2 days under a weight. Using nails is a bad idea as the primary voltage will "track" to them and cause a mess ( oh, I wonder how I found that out ;-) ) |
|
After drying the copper pipe was nailed to the supports using 8 mm cable clips. The nails are not the best solution. The primary current can arc from nail to nail INSIDE the wood. The spacing was about 0.5" from turn to turn and that worked find for 10Kv. There are a few turns missing in the center as again, it will arc from the cable clip nails via the wood to the base of the secondary coil. The minimum gap here was about 1.5". |

|
My very first proto-type primary. This was simply 2.5mm single core cable hammered into the wood. The wood had slits cut into it using 2 hacksaw blades in the saw. The cable was push fitted with a screwdriver and hammer. The oval centre was experimental and found to give good results and ease of tuning. |
|
Proto-type Static spark gap. This was simply 30mm by 15mm copper tubes trapped between 2 bits of wood. The wood was covered with ribbed floor matting. The ridges gave aid for clue to run down them and stick the tubes into place. The actual gap was very small. I just used some thin card to space them while the glue dried. When it was all constructed it worked very well and the tubes were very close and didn't move despite being mounted on rubber. |
|
My first coil was powered from a 8kv 30ma NST. This coil gave out a bright 18" spark. With another secondary a little bigger it gave a massive 24" sparks, though they were rather week and purple. My Current set-up is running on 50ma at 10KV and gives a nice powerful 32" spark. My coil and my Rotary gap will be added as soon as I get some pics developed of them.
|