Some remarks on RF-grounds and counterpoises:
General remarks on RF-grounds:
The RF-ground applied to the bottom of the secondary has to be very
conductive for RF currents because it has to deliver the huge currents that
are converted into the beautiful power arcs we all love. (Look at my experiences
with the 4"-system for an description of an always
to small RF ground.)
| Some different grounding systems (buried in a depth of about 75cm): | ||
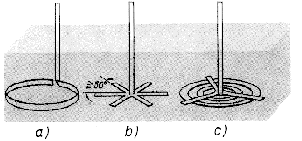 |
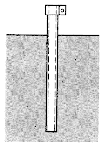 |
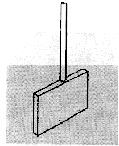 |
band |
rod |
plate |
The resistance (given in Ohm) of the different types of grounding systems
strongly depends on the type of soil (specific resistance given in
Ohm.meter) :
| type of soil |
spec. |
straight band (length) | ring (dia) | rod (length) |
plate | ||||||
| 5m | 10m | 20m | 30m | 20m | 2.5m | 3m | 5m | 6m | 1m2 | ||
| rock | 3000 | 1200 | 600 | 300 | 200 | 95-100 | 1200 | 1000 | 600 | 500 | 700 |
| dry gravel | 1000 | 400 | 200 | 100 | 70 | 30-32 | 400 | 330 | 200 | 165 | 250 |
| wet gravel | 500 | 200 | 100 | 50 | 35 | 15-16 | 200 | 166 | 100 | 83 | 125 |
| dry sand | 1000 | 400 | 200 | 100 | 70 | 30-32 | 400 | 330 | 200 | 165 | 250 |
| wet sand | 200 | 80 | 40 | 20 | 13 | 7 | 80 | 66 | 40 | 33 | 55 |
| clay | 100 | 40 | 30 | 10 | 10 | 4-5 | 60 | 33 | 30 | 17 | 35 |
| fen, bog | 30 | 12 | 6 | 3 | 2 | 1 | 12 | 10 | 6 | 5 | 8 |
| concrete (e.g. foundation), "Ufer-gnd" (*) |
400 | 160 | - | 40 | - | 13 | - | - | - | - | - |
(*) In germany such a gnd is required for new buildings since 1990 (DIN18014). It should be made as a ring on the outside of the foundation (nickel-plated strip steel with cross section >100mm2 and thickness >3mm or round steel with diameter >10mm or copper with cross section >50mm2 and thickness >2mm). Standard is strip steel in 30.3.5mm2 or 25.4mm2.
Besides the grounding itself one should not forget the length of the wires which connect the secondary to the ground:
Jim Lux wrote on the
TCML
on Thu, 22 Feb 2001:
<SNIP>
..but the physical distance means there is a significant inductance, and
for any sort of transient (i.e. a spark discharge), the inductance is what
is going to determine the voltage.
Example: Say you had a 10 meter piece of 1/2" copper pipe connecting the
bottom of your coil and where the spark is going to hit. You have (foolishly)
used the far end (i.e. the place the spark hits) as the ground for your computer.
The resistance is going to be a few milliohms, and even if your spark is
1000Amps pk current, you think that it's only going to be a few volts...
no problem.
But wait, that's not what really happens. That 10 meters has an inductance
of around 10 microhenries. The rise time of that tesla discharge is, say
1 microsecond (actually, it's a lot faster), corresponding, roughly
to 3 MHz. At 3 MHz, the impedance of 10 uH is 188.4 ohms, so that 1000 Amp
discharge is going to make a voltage of 188 kV!!! As you say, WHOA!
Such is the subtlety of trying to shield and isolate high current fast
impulses...
Moral of the story: Think carefully about all the current paths!
<SNIP>
My own experience: I burned the isolation (rated for 2kV) on a wire which was lying on the ground plane (yes, the same ground plane, where this wire was connected to!) by injecting an arc (4"-TC, about 2J per bang) into its end - the wire extended about 3m above the ground plane and the voltage (>>2kV) has buildt up on it due to its inductance (approx. 1uH/m).
This is exact the reason why you should NOT earth your Tesla coil on the wall outlet!
Measurements on
RF-grounds
Of course, this gives only an estimation (measured at 50Hz!) and helps to
find the right type of system and soil (wet, wet, wet :-). To be sure,
one have to measure the resistance. This way you can create different
geometries, e.g. several rods in a line, distance about half the lenght
of the rods. Or some rods spread out in a circle or star... The measurement
can be done with some lengths of wire and an ohmmeter. But it has to be
an ohmmeter which measures with AC (bridge with AC source)! The
standard DC-measurement would lead to polarisation effects and therefore
to a wrong value of RE.
 |
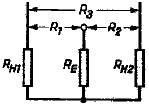
|
The earth resistance is NOT depending on the auxiliary rods: add equations (I) and (II), substitute RH1+RH2 with equation (III) and you get the result:
RE=(R1+R2-R3)/2 |
Instead of the second auxiliary rod one can use the household ground.
An alternative way is to use the line voltage (230V here in Europe) and one
auxiliary rod (this can be the household ground). The variable resistor
RV should have 20-1000 Ohm. Use a HIGH power resistor as
the losses in RV are 2645W at 20Ohm or 53W at 1000Ohm. (If you
measure the voltage and current not at the same time, be sure that the resistor
hasn't change its resistance due to the heat!) RH2 is much smaller
than the inner resistance Ri of the voltmeter and therefore
negligible. R is the hot wire, Mp the grounded neutral wire.
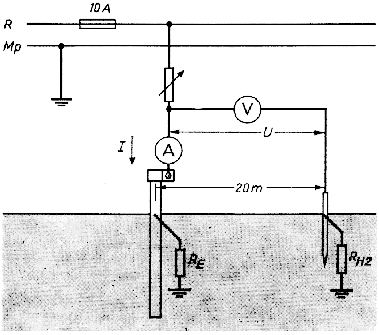
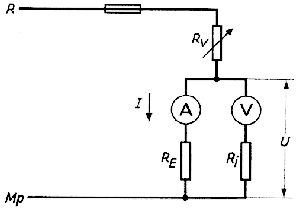
So we've buildt a voltage devider from RV and RE. Knowing
the current and the voltage drop over RE, we get
RE=U/I |
A solution to overcome the grounding problem ('the ground never is heavy
enough!') is to build a balanced twin system, where the base current
from one secondary goes directly into the other secondary and make an RF
ground useless. Read my Vitamini-page to get an overview
on this clever approach.
Real life example: Richard Quick once reported about 6A base current
per kW input power (other coilers report up to 16A). Assuming some values
for a beginners coil: 2kW input power and RE=100Ohm we get voltage
spikes of 1.2kV at the base of the secondary. That's the reason every serious
coiler tells you NOT to connect the base of the secondary to your household
ground! Most old household grounds are only one rod driven into the ground,
far away from where your coil is. Think of RF!
| A word about safety first: you can set the floor on fire using a counterpoise!!! Please be careful an have a fire extinguisher at hand (always a good idea...). |
Usually, the base of the coil is connected to the ground (Fig. A):
|
Using a counterpoise it looks like this (Fig. B):
|
For a practical analysis, the schematic can be reduced to (Fig. C):
|
| Now we should have a look at the voltages involved: 1) Usually, the base of the coil is at zero potential and the top of the coil at voltage Ut. This describes a Lambda/4 situation, frequency is f0 (Fig. D).
|
2) Now consider a Lambda/2 coil buildt out of two
identical Lambda/4 coils: Zero potential is in the middle of the coil, one
end is at +Ut, the other at -Ut (Fig. E):
Of course, the driving frequency fo for this Lambda/2 coil will be the same as for the Lambda/4 coil above. |
3) Now lets increase the top capacitance Ct2 i.e. by factor 2. With the
formula C=Q/U and Q remaining constant, we therefore
half the voltage here (Fig. F):
The zero voltage point will move towards Ct2. If the inductance L2 will be decreased by the same factor (a) the top capacitance Ct2 is increased, the frequency will remain constant:
|
4) If Ct2* raises to infinity (oo), L2* will be zero and the zero voltage
point will be located at the base of the coil (Fig. G):
Frequency is still f0 as in all cases before. |
Lets discuss some problems here:
This is a text from Richard Quick. I found it in the funet-archives (RQEXPS_T.txt). It describes the cointerpoise and some experiments which can be performed with it. I only converted the ASCII-text from the archive in a HTML-version.
Sounds impressive? I assure you it is not! I have been wanting to transcribe some of my lab notes concerning a series of experiments that I happened into quite accidentally in the fall of 1992 while working with a four inch coil system. Before I jump into the simple equipment and instructions required to duplicate these very educational experiments, I want to give a brief history of how I happened onto this line of investigation with Tesla Coil systems. But even before that: The disclaimer!
This short paper was written for those interested in Tesla systems who already have a small working coil or two. These experiments, like any high-voltage or Tesla experiments, can be dangerous. In addition, several setups detailed below can produce excessive radio frequency interference (RFI - EMI). It is understood among ALL coilers that any adjustments, tuning, or changing of connections in a coil system are done with the power off and with the primary capacitors discharged. It is also understood that setups which may produce excessive RFI - EMI are properly shielded (as in a grounded Faraday cage). A REAL Tesla ground is REQUIRED for some of these experiments. You don't want to set up the transmitter configuration detailed below under "Optional Experiments" and ground it to your house wiring!
I was back-tracking down in size from 6 - 8 eight inch coils prior to the construction of a new 10" coil system. I was concerned about the expense in time and materials for the new large primary coil that I was beginning to envision. I wanted to have a work table or platform where I could wind and test fire simple primary coil designs. I was looking to resonate several Tesla secondary coils in the 4 - 5 inch diameter range with a variety of temporary "lashed up" primary coil shapes and sizes. Due to space constraints I wanted a rolling platform with a lower shelf where my homemade capacitor tanks could rest, a side shelf for the placement of spark gaps, and some method of making a simple low impedance connection to my heavy, dedicated, RF ground. I went ahead and built a rolling platform from scratch wood.
The grounding system on my rolling platform is what led to the following series of experiments with electrical counterpoises and RF grounding. The top of the rolling platform had a hole drilled into the center for a ground wire to come through. For a grounding point directly below the secondary coil, a wire is led through the hole and it clamps to a rather solid brass block that was screwed into the underside of the tabletop (junk box find). The brass block has four #6 multi-strand wires soldered to it (scrap wire box, the sections were too short for anything else, so I used all of them). Each wire is insulated with heavy vinyl tubing as it runs down the four legs of the platform (insulation was required here because of the close proximity to the capacitor terminals and the tank circuit wiring).
I looked around for some method of tying the four #6 ground cables together at the base of the platform, and settled on what turned out to be an aluminum traffic sign which came out of a sheet aluminum scrap bin. It fit precisely under the base of the platform, and I bolted the four cables to the conductive plate. A heavy ground strap could be brought in from any direction, the conductive plate pried gently with a screwdriver, and a large surface area temporary connection could be made by inserting the ground strap between the conductive plate and the wooden bottom of the platform.... Now I will move on with this paper.
****************************************************************
MATERIALS REQUIRED ARE:
OPTIONAL MATERIALS:
****************************************************************
Set four or more of the plastic standoff insulators on a concrete, dirt,
or metal floor. A wooden floor will not be satisfactory, and may well become
a fire hazard during the course of experimentation. A concrete basement or
garage floor is ideal. Place the flat sheet of metal on top of the plastic
insulators so that the conductor is electrically isolated 1 inch (2.5 cm)
above the floor. This forms an insulated capacitance or "counterpoise". Use
a clothespin or other small clamp and connect one end of a section of ground
strap (or other flexible low impedance conductor) to the piece of sheet
conductor. Connect the other end of the ground strap to the base wire of
a Tesla secondary coil in a system that has been previously tuned until it
will produce at least 6 inches (15 cm) of spark. The secondary coil should
NOT be connected to any other ground while experimenting with the counterpoise.
Fire the coil using a variac voltage controller on the primary of the step
up xfmr, bringing the coil slowly up and down in power levels.
---------------------------------------------------------------
1) Observe the performance of the coil at various power levels. How
does spark from the coil when connected to the counterpoise compare to spark
from the coil when it is grounded to a low impedance RF ground? Switch the
ground connection back and forth between your counterpoise and your low impedance
RF ground.
2) Observe the space between the counterpoise and the floor when the
coil is in operation at various power levels.
a) My lab notes indicate that at low power the Tesla secondary operated normally without a ground connection. The counterpoise alone is all that is required to achieve efficient resonance during low power operation. However, as power levels grew, spark lengths failed to increase, despite significant increases of input power.
b) The point at which the coil "stalled" (where additional power into the system caused no increase in spark length) was also the point at which a visible electrical disturbance began in the space between the counterpoise plate and the floor. This disturbance was marked by bright corona and sparking between the counterpoise and the floor. This disturbance increased with the amount of power input into the system, though there was little or no improvement in the output of spark from the top of the coil.
c) If you were not able to overwhelm the counterpoise during the experiment to produce any noticeable effect, your counterpoise was too large, or your coil was not processing enough energy. Try a smaller section of flat sheet conductor and re-run the experiment until you are getting visible effects beneath the counterpoise.
----------------------------------------------------------------
1) With the coil ground wire connected to the counterpoise fire the
coil system at various power levels while holding a low pressure tube near
the counterpoise plate. Observe the tube brightness.
2) Repeat experiment #1 above with the coil well grounded to a dedicated low impedance RF ground. Hold the low pressure tube near the ground strap.
a) My lab notes state that when the coil is working off the counterpoise, a low pressure tube indicates significant standing voltage and current. Since the counterpoise is insulated from the floor, leakage and radiation of energy must be unloading the counterpoise. When the counterpoise is overwhelmed, this leakage is quite visible with the naked eye, and appears in the form of corona and sparks to the floor. This indicates a situation where large amounts of RF interference (RFI) is leaving the system.
b) When the coil is grounded to a low impedance RF ground there is only a faint glow from the low pressure tube when it is held near the ground strap. The tube does brighten when one terminal is in direct contact to the ground strap, which shows the ground is energized. This indicates that the RF voltage and current is no longer trapped and radiating, but is going to ground.
---------------------------------------------------------------
1) Connect the base of the secondary coil to the counterpoise. Place the low pressure tube in series between the counterpoise and the RF ground. Fire the coil at various power levels and observe the tube.
a) This experiment clearly shows the need of a dedicated RF grounding system on Tesla resonating systems. At very low power the tube glows brightly, at higher power the tube begins to heat from the RF current through the low pressure gas.
----------------------------------------------------------------
OPTIONAL EXPERIMENTS
Load the Tesla coil system with a toroid or other discharger that is large enough to prevent spark from breaking out, then retune the system with the new discharger. (hint: without spark, retuning may be done by the glow of a low pressure tube {brighter = closer in tune} or by drawing off spark with a grounded probe)
Repeat the experiment series above.
a) The first thing that will be noted is that ground current has increased dramatically when spark is no longer allowed to break out of the discharge terminal. The counterpoise is overwhelmed immediately, even at very low power. The energy forced into the secondary is trapped. Due the damped nature of the secondary oscillations, radiation is inefficient. The trapped energy is forced to ground. THIS IS THE BASIS OF TESLA'S WIRELESS POWER TRANSMISSION IDEA. This may now be called a transmitting coil, or transmitting system.
Take a second Tesla resonator (just a bare coil, no primary or tank circuit) of slightly higher frequency than the transmitting system used to power these experiments. Load discharger onto the bare secondary until the coil is tuned to match the frequency of the "driver" system. This simple uncoupled tuned coil will now be referred to as the "free" coil.
1) Connect the transmitting Tesla coil system {set up and tuned as
detailed under [OPTIONAL EXPERIMENTS]} to the counterpoise. Note: the
counterpoise is overwhelmed almost the instant the transmitter coil is energized.
Connect the base wire of the "free" coil to the counterpoise, then energize
the transmitter coil.
2) Connect the transmitting Tesla coil system to the dedicated RF
ground. Run a ground strap or other flexible low impedance conductor from
the dedicated ground to the base of the "free" coil.
a) The "free" coil is retrieving the RF current from the counterpoise and resonates to spark despite lack of inductive orelectrostatic coupling. This coil may be placed quite some distance, even off axis, from the transmitting coil and will still spark well.
b) The "free" coil still resonates to spark despite the fact that the transmitter coil is driving into a dedicated low impedance RF ground. This shows the ability of even a small coil system, properly set up and tuned, to "power up" a low impedance RF ground to the point where usable energy may be drawn off.
---------------------------------------------------------------
These experiments clearly show the importance and function of RF grounds for the efficient operation of Tesla resonators. The more advanced "Optional Experiments" show the basis of Tesla's wireless power transmission through earth resonate ground currents.
Richard Quick
... If all else fails... Throw another megavolt across it!
...![]()
